November 15, 2012 matplotlib helvetica tutorial
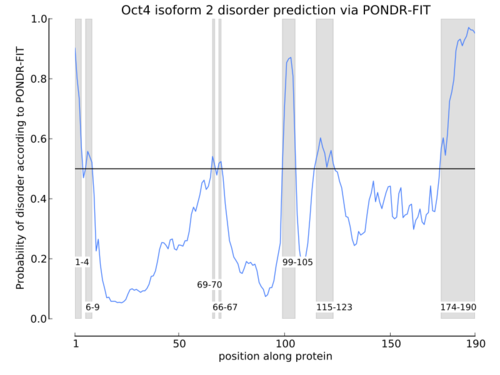
If you’re a typography junkie like me, you’re probably sick of seeing Bitstream Vera Sans as the typesetting font for Python’s plotting library, Matplotlib.
Just look at it:

So ugly, I know.
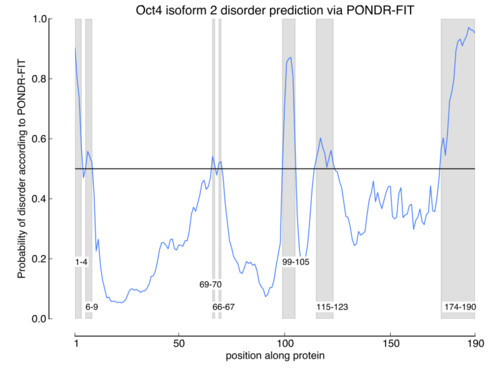
While Helvetica is a controversial font, it is simple, clean, and undisputedly easy to read. In my scientific figures, I’m not going for originality in the typography, I just want it clean and readable. And, as I use Helvetica in my own documents, I want my plot text and my document text to match, without having to go into Adobe Illustrator and change it all.
If you’ve tried to add Helvetica by editing your .matplotlibrc file
You’ve probably seen this error:
/Library/Frameworks/EPD64.framework/Versions/7.3/lib/python2.7/site-packages/matplotlib/font_manager.py:1216: UserWarning: findfont: Font family ['sans-serif'] not found. Falling back to Bitstream Vera Sans
Adding Helvetica to the default font list
Helvetica is stored in OS X as a .dfont file which is inaccessible to Matplotlib, so we need to make it accessible. We will do this in six (6) steps.
1. Download and install Fondu to convert Mac-Helvetica to ttf-Helvetica
EDIT: changed source .tgz install to homebrew install.
To install Fondu, use homebrew, the “missing package manager for OSX.” It’s really fantastic, downloading and installing dependencies automagically for each package.
After you install homebrew, the command to install Fondu is,
brew install fondu
You may need to brew update if you are getting an error.
2. Find Helvetica on your system
Can use ‘FontBook.app’ to find where Helvetica is on your system, but in all likelihood it’s here:
/System/Library/Fonts/Helvetica.dfont
Need to convert this font file to .ttf via Fondu.
3. Find where matplotlib stores its data
To find out where matplotlib stores its data, we use this command. Note that these outputs are specific to my machine and Python installation.
$ python
>>> import matplotlib ; matplotlib.matplotlib_fname()
/Library/Frameworks/EPD64.framework/Versions/7.3/lib/python2.7/site-packages/matplotlib/mpl-data/matplotlibrc
We need to put the .ttf in: matplotlib/mpl-data/fonts/ttf
$ cd /Library/Frameworks/EPD64.framework/Versions/7.3/lib/python2.7/site-packages/matplotlib/mpl-data/fonts/ttf/
$ sudo fondu -show /System/Library/Fonts/Helvetica.dfont  # need sudo access to get into the .dfont directory
If this is not your own machine, copy the Helvetica file to somewhere you can edit, and then run fondu:
$ mkdir ~/font_copies ;cp /System/Library/Fonts/Helvetica.dfont ~/font_copies
$ cd /Library/Frameworks/EPD64.framework/Versions/7.3/lib/python2.7/site-packages/matplotlib/mpl-data/fonts/ttf/
$ sudo fondu -show ~/font_copies/Helvetica.dfont
Because we specified -show, which in this program is the equivalent of --verbose, we see all the files that are created. I don’t know why there’s a bunch of “Untitled” files but we’ll just leave them there. Now you should have a bunch of Helvetica*.ttf files in this directory. Let’s double-check:
$ ls -1 Helvetica*   # The '-1' argument forces the output to be a single column
Helvetica.ttf
HelveticaBold.ttf
HelveticaBoldOblique.ttf
HelveticaLight.ttf
HelveticaLightOblique.ttf
HelveticaOblique.ttf
BUT WAIT. Before you can go on happily using Helvetica, you need to set Helvetica as the default font in your .matplotlibrc file. Remember we found the location of your matplotlibrc file using matplotlib.matplotlib_fname() ?
4. Edit your .matplotlibrc file
The matplotlibrc file gets read in every time you import matplotlib, and this is where you can set customizations such as default fonts and colors. Since we’re good computer scientists, we’re going to copy the original .matplotlibrc file into a personal directory so it doesn’t get over written when we update matplotlib.
$ cp /Library/Frameworks/EPD64.framework/Versions/7.3/lib/python2.7/site-packages/matplotlib/mpl-data/matplotlibrc ~/.matplotlib/matplotlibrc
Now use your terminal-based editor of choice (mine is Emacs) to edit the file:
$ emacs -q ~/.matplotlib/matplotlibrc # the '-q' doesn't load my .emacs file which has settings that aren't compatible with my terminal
Find the line:
#font.sans-serif : Bitstream Vera Sans, Lucida Grande, Verdana, Geneva, Lucid, Arial, Helvetica, Avant Garde, sans-serif
This list of fonts is ordered in decreasing priority, meaning that Bitstream Vera Sans is used first, but if it’s not there, use Lucida Grande, if that’s not there, use Verdana, and so on. We want to uncomment it (remove the #), and make Helvetica the first priority:
font.sans-serif : Helvetica, Bitstream Vera Sans, Lucida Grande, Verdana, Geneva, Lucid, Arial, Helvetica, Avant Garde, sans-serif
You can remove Helvetica from the end of the list, but it shouldn’t matter because the program will stop searching once it finds a font it knows.
5. Force matplotlib to re-scan the font lists and add Helvetica
Now we need to force matplotlib to re-create the font lists by removing the files.
$ rm ~/.matplotlib/fontList.cache ~/.matplotlib/fontManager.cache ~/.matplotlib/ttffont.cache
$ python -v  # watch all the imports fly by
>>> import matplotlib.pyplot as plt  # this will import and create the *.cache files we just removed
I was stuck at this:
dlopen("/Library/Frameworks/EPD64.framework/Versions/7.3/lib/python2.7/site-packages/matplotlib/ft2font.so", 2);
import matplotlib.ft2font # dynamically loaded from /Library/Frameworks/EPD64.framework/Versions/7.3/lib/python2.7/site-packages/matplotlib/ft2font.so
for quite some time, but be patient. It will finish :)
6. Plot your figures with Helvetica!
Helvetica!

What if you want to use something other than Helvetica?
If you have a .ttf file for the font
My favorite fixed-width font is Inconsolata-dz (this fixes the weird quotations of Inconsolata), which I use in all my terminal and code editing programs. If you installed the font before installing matplotlib, you can probably just use it. Let’s check the fontList file just to make sure:
$ grep Inconsolata ~/.matplotlib/fontList.cache
S'Inconsolata'
S'/Users/olgabotvinnik/Library/Fonts/Inconsolata.otf'
S'Inconsolata-dz'
S'/Users/olgabotvinnik/Library/Fonts/Inconsolata-dz.otf'
aS'/Users/olgabotvinnik/Library/Fonts/Inconsolata.otf'
aS'/Users/olgabotvinnik/Library/Fonts/Inconsolata-dz.otf'
Looks like Inconsolata’s there, so let’s try it out! To change your default font on the fly, add this to your code:
import matplotlib as mpl
mpl.rcParams['font.fixed-width'] = 'Inconsolata-dz'
mpl.rcParams['font.family'] = 'fixed-width'
If you do not have a .ttf file for the font
Say you’re a huge fan of the sans-serif font Gotham and want to use it for your plots. It’s a proprietary font and will probably not appear as a .ttf file. Follow the same steps 1-6, but find the location of your font using FontBook.app. Search for your font, and then either hit Command-R or click File –> Show in Finder. Then drag that file into Terminal and you’ll get the full path name. I use this Finder-Terminal drag and drop trick all the time!
To edit your final .pdf files in another program such as Illustrator
After producing your matplotlib figures, you may still want to tweak the axis or typography. To be able to do that, edit your ~/.matplotlibrc file from:
pdf.fonttype = 3
To:
pdf.fonttype = 42
And that’ll do it! Hat tip to Benjamin Reedlunn!
Appendix
The code and data used to create these files can be found here. To create the file, run the command:
python pondrfit_plots.py -f *.pondrfit -t 'Oct4 isoform 2' -c '#0080FF' -s
One of the hardest parts of this code was figuring out how to extract the start and end of the disordered regions (disorder score>0.5) when all I had was a sequential list of indices for each region. Turns out the trick is using both itertools and operator:
ranges = []
for k, g in groupby(enumerate(df_disordered.index), lambda (i,x):i-x):
	inds = map(itemgetter(1), g)
	ranges.append([inds[0], inds[-1]])
Where df_disordered.index is the indices of all the rows whose disordered score is greater than 0.5. This code is quite magical to me, as I’m still figuring out groupby and map but I will understand it!
OSX 10.7 (and older) Lion users
Apparently ‘fondu’ does not install on OSX 10.7 (I’m running 10.8) due to the XCode update in 10.8. One reader suggested FontForge as an alternative to convert between .dfont and .ttf formats. Based on Apple’s “Leave old OS’s behind” strategy, I’m guessing users of anything older than 10.7 will also need to use FontForge.
UPDATE: This same user informed me that FontForge does not perform the full conversion necessary for matplotlib in iPython (below). If you are running into a similar problem, I suggest finding someone with OSX 10.8 and getting them to do it. I cannot post the files myself because Apple technically prohibits tampering with system fonts.
iPython
If you use iPython notebooks, you may need to take an extra step for your rendered figures in ipython notebook --pylab inline to appear with Helvetica. I did the following:
- Shutdown and re-open my notebook. This purges all the imports. This can also be accomplished by interrupting and restarting the kernel from within the notebook, but I wanted a full reboot.
- Edit my both my
~/.bashrcand./bash_profile(since I’m not sure which one matplotlib uses) to include the text:export MPLCONFIGDIR=$HOME/.matplotlib, which should tell matplotlib to look in that directory for the configuration files, such as your.matplotlibrcfile.
Hope that helps!
EDIT: Potential issues with other fonts.
Thanks to Benjamin Reedlun about the tips for specifying other fonts - it may not be as straightforward as you hoped.
Olga, here are two other potential issues your readers might run into. I had success using your method with two different TrueType fonts, but then I tried to install TeXGyreHeros, a free Helvetica Clone with additional characters.
I found TeXGyreHeros as OpenType files (.otf extension), so I opened them up using FontForge. When I went to save TeXGyreHeros as .ttf files, FontForge pointed out that, “The convention is that TrueType fonts should have an Em-size which is a power of 2.” Each of the .otf font files have sizes of 1000. (In FontForge, Element > Font Info > General) Comparing the character sizes in TeXGyreHeros to those in a Helvetica.ttf, I decided to increase the size to 2^11 = 2048. After doing this, the sizes in TeXGyreHeros and Helvetica matched up reasonably well, so I saved TeXGyreHeros as .ttf files.
I placed the TeXGyreHeros.ttf files in my matplotlib/mpl-data/fonts/ttf directory, rebuilt my font lists, and specified “TeXGyreHeros” as my default font in Matplotlib. However, Matplotlib could not find TeXGyreHeros. After much playing around, I found that the TeXGyreHeros.ttf files had an attribute called “Preferred Family”. (In FontForge, go to Element > Font Info > TTF Names.) The “Preferred Family” was “TeX Gyre Heros” (with spaces between each word). I supplied Matplotlib the font filename, “TeXGyreHeros”. Once I made the two names match, or deleted the “Preferred Family” attribute, then everything worked correctly. Looking back at the two previous TrueType fonts I installed, neither of them had the “Preferred Family” attribute, so that is why I did not run into this issue before.